
How to Install Facebook Pixel via Google Tag Manager
Looker Studio Masterclass, my advanced & premium course, is now publicly available. 100% for free!
No signups, upsell funnels, order bumps, or nonsense!
Access here >>

Ahmad Kanani
This tutorial has originally been published on MeasureSchool:
Facebook Pixel helps you track user interaction and conversion data and use them to improve our Facebook marketing strategies, create custom audiences, and optimize campaigns to increase conversion rates and ROAS.
In this tutorial, I am going to show you three methods to install Facebook Pixel via Google Tag Manager and customize the reports for various purposes.
1. Method #1: Automatic Installation
This method is fast and simple, but it has some limits and issues and I do not recommend it. However, I’m going to cover it quickly.
First, let’s log in to Facebook Ad Manager and find our Pixel.

Click Events Manager.

Select your Pixel.

On the top right, click Set Up and then Install Pixel.

Since we want to go through an automatic installation, we should select Add code using a partner integration.

Select Google Tag Manager.

Now we need to connect and authorize Facebook to access our Google Tag Manager account.
One of the reasons that I don’t recommend the automatic method is because after authorizing the Google Tag Manager account, Facebook will immediately apply changes and will publish the container. Therefore, if we have any unsaved changes in our workspace those will be published as well, causing problems and confusion.
Click Continue.

After authorizing our Google Tag Manager account, we can see its name and details in the box.
Click Finish Setup.

Next, Facebook tries to help us set up extra events, but we’re going to skip.

Now, let’s head over to our Google Tag Manager and check the tag that Facebook has created automatically.

We can also head over to the Versions tab and check the details of the changes that’s been published.

The lack of flexibility and control is another reason that I don’t recommend this method. Facebook automatically publishes a work-in-progress container that might cause confusion or create complexities, possibly breaking the front-end through publishing tags that have not been ready or tested to be published yet.
2. Method #2: Manual Installation
This method is the most flexible and powerful option and therefore, it is the main focus of this tutorial.
2.1. Setting Up the Pixel Manually
Let’s get back to Facebook Ad Manager and open Pixel setup dialog again.
This time, click Manually add Pixel code to website.

Once prompted with the Pixel code, click Copy code to clipboard.

Now go to Google Tag Manager, delete the previous tag and create a new one.


Call the new tag FB - Base Pixel and click the Tag Configuration.

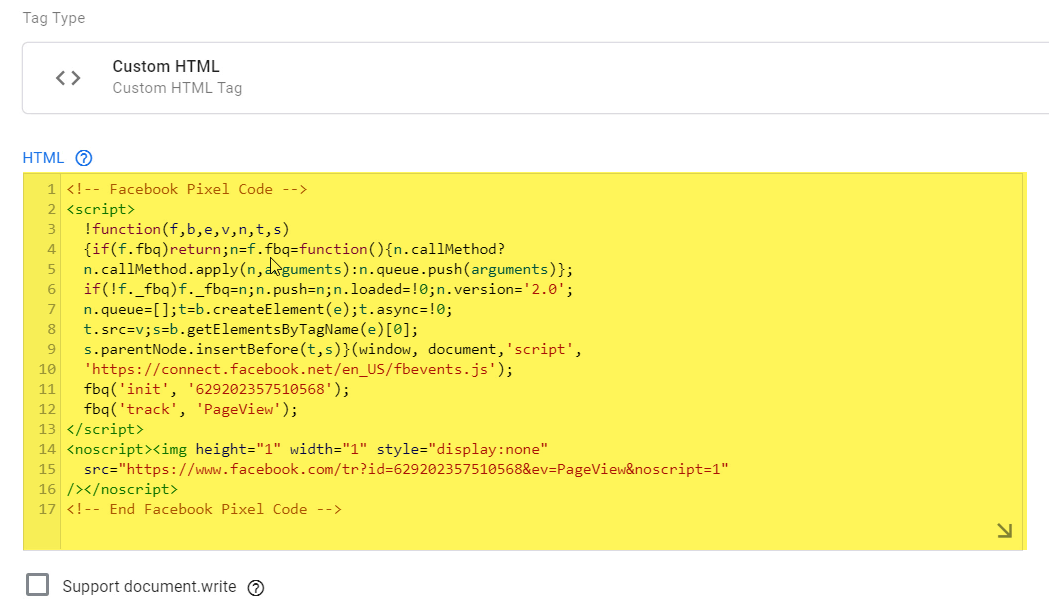
Because we don't have any built-in tags for Facebook, we need to use a custom HTML tag.

Now, paste the JavaScript code that Facebook has given us.
Next, add All pages trigger to the tag.


And save the tag by clicking Save.
Before we preview the container and verify the setup, let’s take a closer look at the Facebook Pixel code.
Facebook Pixel has two main sections. The first part is the <script> tag, from lines 2 to 13, and the second part is the <noscript> tag which is meant for the browsers that have JavaScript disabled.
If a page loads in a browser that does not support JavaScript, the <noscript> portion of the code will be executed. But because Google Tag Manager container itself is made of JavaScript, and it executes Custom HTML tags when JavaScript is supported, we can take this piece of code out and put it in an image tag instead.
But this is not critical because most browsers support JavaScript, and if one doesn’t, the website is most likely not going to function correctly anyway.
Now let’s take a closer look at the first part of the Pixel code, the <script> tag:
From lines 3 to 10, there’s a function, which loads a JavaScript library from Facebook servers.
Once the library is loaded, on line 11, we have the pixel initiation code:
fbq(‘init’,’<Pixel ID>’);
Which used the loaded library to initiate the specific Pixel ID. This line activates the Pixel on the page so it can “listen” to events to collect and report them to Facebook Ad Manager.
Line 12 is an event:
fbq(‘track’,’PageView’);
This line tells the already active and listening Facebook Pixel to track a PageView event and report it to Facebook.
So to recap, the code first loads a library, then initiates the Pixel to listen for events, and finally track the first event: a PageView.

Now let’s enter Preview mode and navigate to our website to verify the setup.

As we can see in the Preview window, the Facebook Base Pixel has been fired once.

We can also check it using the Facebook Pixel Helper extension for Google Chrome which shows the PageView, and some information about the page such as its URL is being recorded.

While checking Facebook Pixel Helper, we can also see that some Microdata has been automatically detected and reported to Facebook.
2.2 Viewing automatic events
The events that are detected automatically are identified with a blue lightning icon on the widget and, the ones that we set up and fire ourselves are identified with a green checkmark.
Now let’s head back to Facebook Ad Manager and verify that it is receiving the event.
Click Test events to see all the recent activities of the Pixel.

Click Clear Activity to remove the previously recorded activities.

Now refresh the website and come back to this screen.
As we can see, the PageView is received by Facebook.

Next, if we click on a button, for example, a Quick View or Add to Cart Button on our website. The Button Click is automatically detected by the Pixel and we can see it in Facebook Pixel Helper extension.

However, it cannot be seen on the Facebook Ads Test Events page since that list only shows the events that we trigger ourselves and not the ones that are automatically detected.
In order to see other activities, click Events Manager, expand the menu, and choose Analytics.


Select the Pixel that we are using.

Next, click Activity, Event debugging, and Refresh.


Now we can see all the events, even the automatic ones.

Keep in mind that although Facebook can detect microdata and some events like button clicks, it's not reliable, and can sometimes be unexpected or inaccurate. That’s why I always recommend to deliberately track events that are important for us to ensure reliable tracking and that the information is being recorded the way intended.
If we only want pageviews to be tracked by the Facebook Pixel, this single tag is all we need. We can use these pageview events and the page URLs in Facebook Ads Manager to create custom conversions or custom audiences.
But a page view is just a simple user interaction and it doesn’t mean that the user has actually interacted with the page, i.e. clicked somewhere, watched a video, added something to cart or purchase a product.
In the second part of this tutorial, I’m going to show you how you can get the most out of your Facebook Pixel tracking by setting up additional events.
When we start tracking additional events, not only we can see how many times that event has been fired, but also we can create custom audiences or conversions based on that event and its properties and better optimize our Facebook campaigns.
2.3 Setting Up Custom Events
There are two types of events that we can track to a Facebook Pixel; standard and custom.
Standard Events
Standard events are the popular user interactions recognized by Facebook, such as Lead, View Content, Add To Cart, Initiate Checkout, and Purchase.
Custom Events
But even if Facebook doesn't recognize our activity as a standard event, for example, time spent on pages, we can create a custom event.
Let’s start by separating our Facebook Base Pixel into two parts. We need to take out Facebook PageView tracking code and add it to its own tag.

We need to do this because we want to fire more events, different from this PageView, and those events will also require the Pixel to be initiated.
Click Save after cutting this line of code.
Now create another Custom HTML tag and name is FB - Pageview. Paste the tag and add the opening and closing script tags to it.
<script>
fbq(‘track’, ‘PageView’);
</script>
Add All Pages trigger and click Save.

2.4 Assigning the Order of Tags to Be Fired
Now that we have both Base Pixel and PageView tags, we need to make sure that the Base Pixel fires before other tags. There are two ways for assigning the firing order to tags.
Tag Firing Priority
The first method is called Tag Firing Priority. By default, the firing priority of all tags is set to zero. If we assign other priorities to tags, the tags with the biggest number will fire first. But this method only guarantees the firing sequence, and we can’t be sure that the next tag fires after the completion of the preceding one.
Tag Sequencing
The next method, which we are going to use, is called Tag Sequencing. We can assign an order to tags to fire, and Google Tag Manager will ensure that the first tag fires AND finishes its execution completely before the next tag fires.
Let’s set this up.
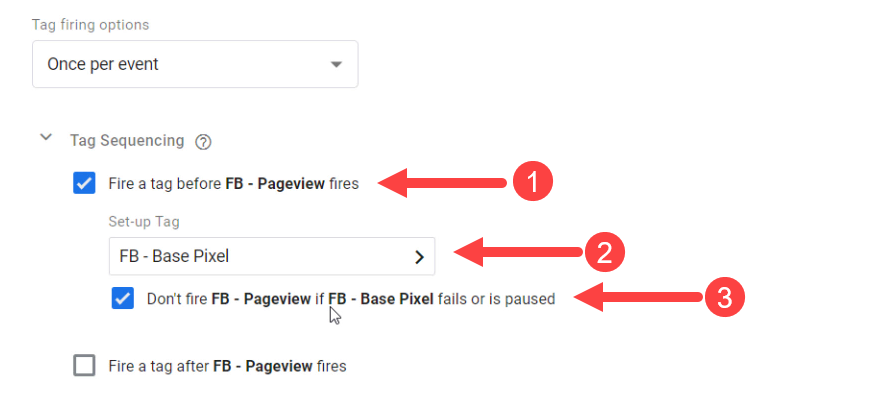
First, click on the PageView tag, click Advanced Settings, and Tag Sequencing.

Choose Fire a tag before FB - PageView fires, and select FB - Base Pixel as the Set-up Tag.
The tag that fires before another tag, is called a Set-up Tag
Also, click Don’t fire FB - Pageview if FB - Base Pixel fails or is paused. We need to do it because if Facebook Base Pixel fails to fire or execute, our single line of code to record the Pixel event will not work either.
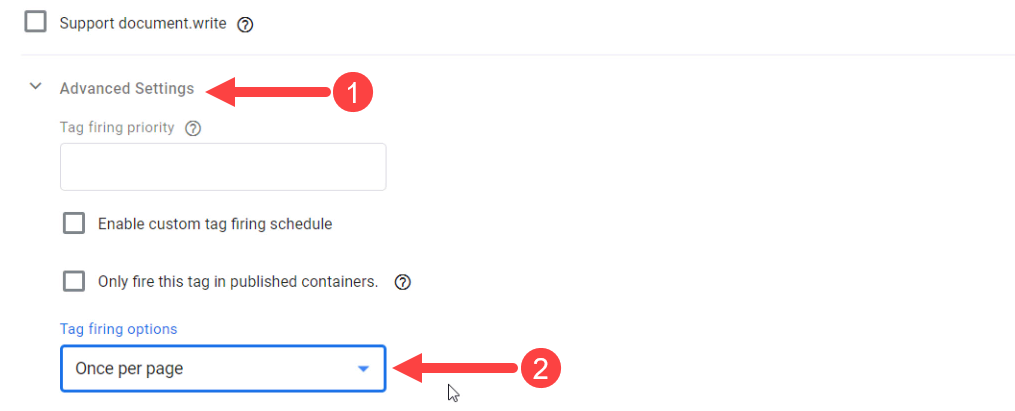
Limiting the Base Pixel to Fire Once per Page
If we add more tags, we don’t need the Base Pixel to be initiated more than once. To make sure of this, let’s open the Base Pixel tag, click Advanced Settings, and select Once per page from Tag firing options.
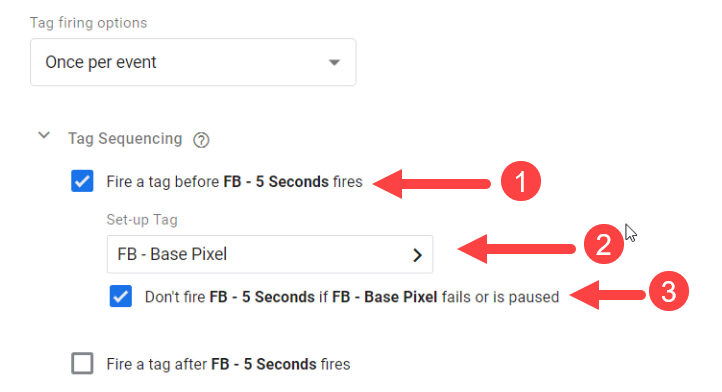
Now, let’s add a new Custom HTML tag type for the users who spend more than five seconds on the page and name it FB - 5 Seconds. Since it is not a standard event, we should use the following code:
<script>
fbq(‘trackCustom’, ‘5 Seconds’);
</script>
Set the FB - Base Pixel tag to fire before the FB - 5 Seconds.
Create the 5 seconds trigger by clicking Triggering and the add button at the top.


Name it Timer - 5 Seconds and click Trigger Configuration.

Choose Timer from the list.

Enter 5000 as the Interval (it’s in milliseconds), 1 as the Limit, and select Event > matches RegEx > .* as its conditions.

Now save the tag and refresh the preview and the website.

As we can see, all the tags have been fired on our website.

We can also verify this using the Facebook Pixel Helper.

Now let’s head back to the Events Manager and select the Pixel. Click Clear Activity, and refresh the page again to make sure the data is being received by Facebook.

2.5 Tracking Add to Cart Events
To track Add to Cart events, we need to define a Click trigger in the Google Tag Manager to track Add to Cart clicks.
Click Triggers and then New.

Name it All Clicks, and click Trigger Configuration.

Choose All Elements from the list.

Choose All Clicks and Click Save.

Then refresh the preview and website. Now if we click on an Add to cart button on the website, a new Click event appears in the Preview window which we can click on to access Click variables which we need to use to create a specific click trigger for the Add to cart button.


Note: The built-in variables in Google Tag Manager should be enabled first to see the Click variables. To enable them, go to Variables > Configure and check all the click variables from the list.

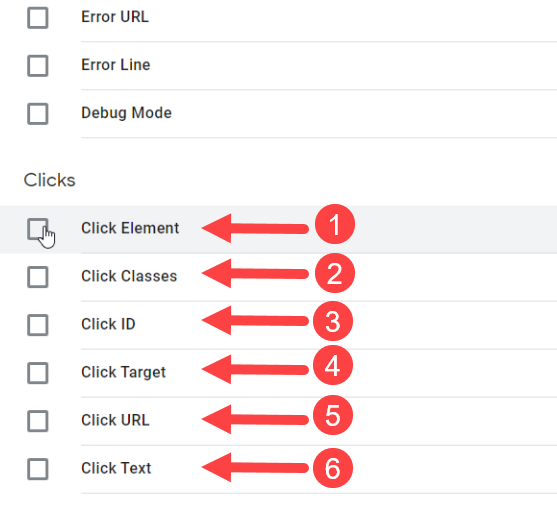
Refresh the preview and website again. Now when we click on a button, we can see all the Click Variables on the list.

2.6 Limiting the Trigger Variables
We can limit the created event to only fire on the specific buttons, such as the Add to cart buttons.
To do this, let’s go to Triggers on Google Tag Manager and click the All Clicks trigger.

Rename it to Add To Cart - Clicks and choose Some Clicks. Next, select Click Text → Equals → Add to cart and save the changes.

Now head over to Tags and duplicate the FB - 5 Seconds tag and rename it to FB - Add To Cart. Change the HTML code to the below code lines:
<script>
fbq(‘track’, ‘AddToCart’);
</script>
Notice that AddToCart is a standard event, that why use ‘track’ instead of ‘trackCustom’
The tag sequencing is already set since we have copied the tag, but we need to change the trigger. Remove the current trigger and choose Add To Cart - Clicks. Save the tag after making the changes.

Now refresh the preview and website. We can see that when we click on the Add to cart button, the FB - Add To Cart tag fires and the Facebook Pixel Helper shows it as well.


We can also see the event in the events' section of Facebook Ad Manager and that it has been recognized as a standard event.

Now, before we proceed to the third and final method of Facebook Pixel tracking, I want to show you an advanced use case which is achieving accurate event tracking with multiple pixels.
2.7 Accurate Event Tracking With Multiple Pixels
In the previous example, we only had one Facebook Pixel initiating on the page. But in some cases, unlike what we have done thus far, there might be multiple Pixels initiated on a single page.
For instance, there could be multiple stakeholders involved, or there could be two or more agencies working with the same brand. Some doing brand advertising and the others running performance marketing campaigns, and each of them may want to track data into their own Facebook Pixel because they might have different strategies and to track events differently.
But for all of these pixels, the base pixel should be initiated for the events to actually function properly. Now the problem is that if we have more than one pixel initiated on the same page, every single event will be picked up and reported by all of those pixels.
To see this situation in action, let’s duplicate our FB - Base Pixel and name it FB - Base Pixel 02. Then change its code on the 11th line by replacing the last three digits with zeros.

Now refresh the preview and website. We can see that there are two Facebook Pixels initiated on the page.
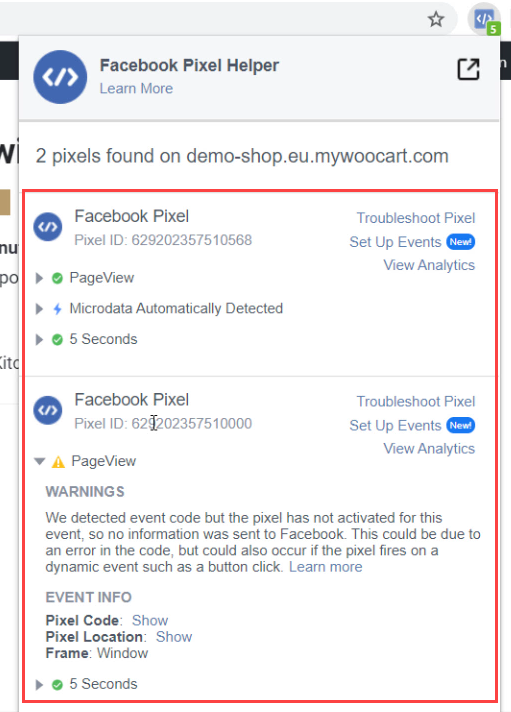
As we can see, some of the events may fail to fire correctly when there are multiple Pixels on the same page and all the events that fire after those Pixels initiation will be picked by both Pixels.
There is a solution to this problem: using the command trackSingle.
Click the FB - Pageview and change the code in this way:
<script>
fbq(‘trackSingle’, ‘629202357510568’, ‘PageView’);
</script>
Now it will track a single Pixel. Note that we have defined exactly which Pixel do we want to track our event to, simply by copying the Pixel ID and adding it to the code between ‘trackSingle’ and ‘PageView’.

We can also apply these changes to FB - Add To Cart. For the FB - 5 Seconds tag, we should use the following code since it is a custom event.
<script>
fbq(‘trackSingleCustom’, ‘629202357510568’, ‘5 Seconds’);
</script>

Now let’s refresh the preview and visit the website one more time. We can see that everything is now recorded only for the first Pixel.

We can also follow the same procedure and set the FB - Add To Cart tag to the second Pixel.
2.8 Using the Recorded Pixel Events
The Pixel events we have created can be used to create custom audiences or custom conversions.
Click Custom conversions and Create Custom Conversion.

Select the desired event and add a rule. Next, give it a name and click Create.

We can later take a look at how many times this custom conversion has happened and use it to optimize our campaigns.
Method #2 Recap:
Let’s quickly recap the second method: We learned how to install Facebook Pixels manually using a Custom HTML tag. We learned why it is better to separate the PageView event from the Facebook Pixel initiation part. We learned how to use Tag Sequencing to make sure that the Pixel is initiated before any event fires. And finally, we learned how to accurately track events with multiple pixels initiated on the same page.
3. Method #3: Using a Custom Template to Install Facebook Pixel
Now it’s time to learn the final method of implementing Facebook Pixels which is using Custom Tag Templates provided by Simo Ahava, who’s kind enough to create and share this Custom Tag Template with GTM community.
This method is a faster option compared to the previous approach while maintaining equal flexibility and effectiveness. Let’s start by creating a new tag.
Previously, we used Custom HTML as the Tag Configuration since there was no built-in tag for Facebook. However, this time we’re going to use Custom Templates by clicking Discover more tag types in the Community Template Gallery.

The difference between the custom templates and built-in tags is that custom templates are created by people other than the Google Tag Manager developers.

Let’s find the Facebook Pixel template by Simo Ahava, and use it to create our Facebook Pixel tag without losing any flexibility, or control.

Click Add to workspace, review the required permission by the Tag template and then click Add.


Rename it to FB - Pageview - CT.
Copy the value of your Pixel ID in Facebook Pixel ID(s) and choose PageView from the Standard options of Event Name. Then, add All Pages trigger and save the template.

Let’s remove the previous tags and refresh the preview and website once more. We can see that our new tag has been fired on the page.

Now let’s add the Add To Cart tag.
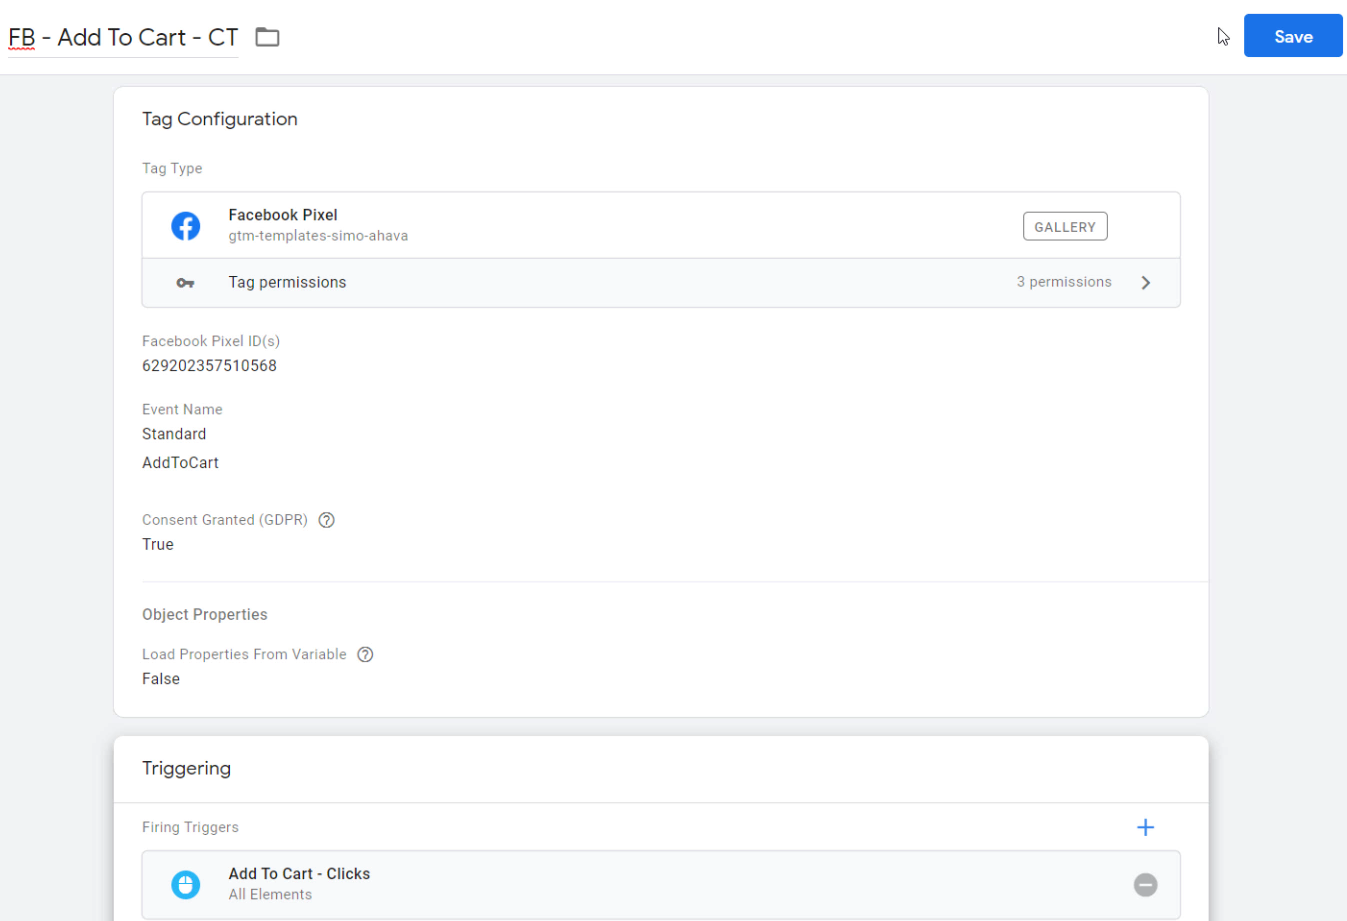
Duplicate the current tag and rename it to FB - Add To Cart - CT. Choose the AddToCart event and Add To Cart - Clicks trigger.
Make another copy of the Pixel tag, rename it to FB - 5 Seconds - CT. Then, choose Custom from the Event Name options and enter 5 Seconds. Next, select the Timer - 5 Seconds trigger and save the tag.

Now if we refresh the preview and website, we can see that all the tags have been fired on the page.

Simo’s Tag template will ensure that the Facebook Base Pixel is initiated before each of these events fires and also that it does not fire more than once. Therefore, unlike what we had to do in the manual installation method, we do not need to configure any tag sequencing.
Plus, the template has trackSingle attributes by default.
We can also disable the collection of metadata by clicking Disable Automatic Configuration from More Settings.

Additionally, we are allowed to revoke the consent of users to be tracked by Facebook by choosing False from Consent Granted (GDPR).

This way, the tag will be queued before the user gives consent by accepting to be tracked.
Summary
In this tutorial, we went through three methods of Facebook Pixel tracking via Google Tag Manager. The first approach was the automatic installation which I do not recommend due to the limits it brings us. The second method was the Manual Installation with absolute flexibility and control but was a bit complicated. And the last method was using a Custom Template provided by Simo Ahava that has the same capabilities compared to the manual installation method while being easier and faster.
Join Newsletter
Community
Tools
Learn Analytics & CRO


